Nesflix, formerly known as DarNES
How we put Netflix on an original unmodified Nintendo Entertainment System.
Hello! Since the last Netflix hackday (about a week two weeks ago), I’ve received a lot of comments, feedback, and general inquiries about “how did you do it.” I decided to try to tell you, within a reasonable amount of time, the answer to that, and let you know how Alex and I (and later Carenina) put our collage of the Netflix interface, with a cached video of House of Cards 3, onto an actual unmodified original NES (the “old nintendo”), and why we stopped short of going for live streaming. TL;dr, we thought it would be fun and we ran out of time, respectively, but as you might expect, there’s more to it than that. I’ll tell you about the rap video and that we didn’t win later, if you stick around. If you aren’t a developer, you probably want to skip the implementation part in the middle.
I’d like to point out that this is by no means an official Netflix project, and I don’t speak with Netflix’s voice, merely my own. This is a developer tale that, despite being a hack, ended up taking on a life of its own, while it dragged Alex and I along with it. It has all of the usual features of a dev story - there’s project creep, crunch time, changing requirements, cut features, and last minute bug fixes, but in the end, we ended up with a playable rom and something that made us (and hopefully you) smile.
Inception
About 5 months ago, I went to visit our partner device implementation team since I was having some trouble getting a new feature to work with a particular device. They were engaged in an ad-hoc meeting about how they were going to handle porting Netflix to a relatively low end device. They all seemed a bit downtrodden, and given the collective brilliance of that team, I knew that it had to be a pretty tough problem. One of them was animatedly describing a possible solution, but from the grim looks, I guessed that it wouldn’t be easy to implement.
I figured they could use some cheering up. “You guys and all your registers and CPU cores and memory. It’s a downright paradise to be working on a device as powerful as this!”
They smiled. “Oh, sure Guy. It seems pretty tricky to get XYZ working on ABC system.”
“Bah,” I rebutted, “you can’t do that? Here, why don’t you take my UI job for a while and I’ll handle the device work.”
They all chuckled. Most of the UI engineers didn’t usually start conversations that way. Unfortunately, the momentum took me.
“In fact, I’ll do you one better. I’ll implement Darwin on the original NES! How’s that? Just one register and a couple index registers!” Darwin is our current cinematic ten foot UI, usually seen on televisions.
The reactions all instantly went sideways.
“There’s no way–” “The ORIGINAL NES?” “Like, Super Mario Nintendo?” “I think I have one in my basement…” “How are you even going to get video to–”
“Alright alright.. We can talk about DarNES later. Before you go back to your business, does someone have a moment to talk about the DEF feature?”
I got the help I needed, but no one was going to forget my insane claim. I knew I was going to need some help, so I talked to Alex about it, as we’d worked together on several projects before. He wanted to see some early code, so I hit the NESDev forums and got some rudimentary examples working. From there, we set some ground rules:
Rule 1: It had to run on an actual device, not an emulator. The emulators these days are great, but we wanted to see this on actual hardware.
Rule 2: If possible, it shouldn’t involve modifying the hardware. It was tempting to just clean the insides of an NES out and put a raspberry pi inside, running our cartridge through an emulator. The goal was to have something you could just put into an NES and start streaming.
Rule 3: The video had to go through the NES in some way. While we knew the device didn’t have an official network stack, it would still be in keeping with the spirit of the later NES games to provide add on chips or processors to offload some of the work, such as the memory mappers or the more advanced effects processors.
Knowing the Device and its Limits
The original NES is now about 30 years old - it was released in Japan on July 15, 1983 - so it bears almost no technical resemblance to even a modern cell phone. Forget the phone’s screen, the NES wouldn’t even be able to do the signal encoding and decoding just to register on a modern day cell phone network. Just processing the microphone input alone would probably blow out the device already!
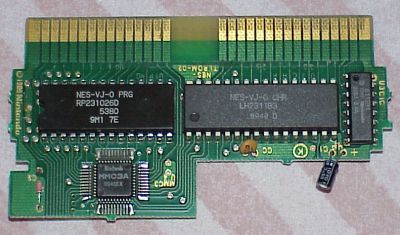
There’s a lot of technical details available on the NES, but for our purposes it’s good enough to know that the CPU is a 6502 variant chip (with the 3 registers I mentioned) running at about 1.79MHz, 2KB of RAM, with a graphics processor called the PPU (Picture Processing Unit) clocked around 5.4MHz. The actual clock on the PPU is much faster to align with the NTSC scan rate, but the speed that programmers get to deal with is the much lower one. Since we were mostly drawing on “the background” to the PPU and we weren’t modifying the attribute table, we could easily get 2 bits of color, leaving us 4 colors for use. People who know what they’re doing can show more colors on the screen, but knowing the time we had, we chose not to investigate that path.
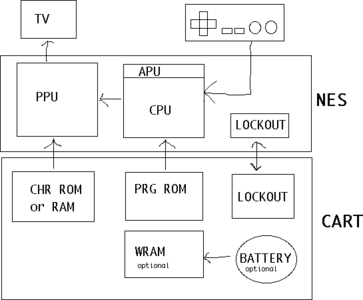
While NES games do things many different ways, we were trying to find the right balance between what we could do in a short amount of time vs. having enough computer resources to be able to draw something resembling the Netflix interface. We dropped sound right off the bat, as programming the APU (audio processing unit) looked complicated and CPU consuming. Having 2KB of RAM meant that we could hardly process a decent length URL without external memory, but even trying to assemble two 1500 byte packets would already blow all available memory without even trying to do something with their payload. At a minimum, we figured we should move basic networking, authentication, encryption, and DRM to a daughtercard that would be attached to the cartridge.
To further complicate things, there’s only a very limited amount of time you have to update the PPU from the CPU, what I’ll refer to as “VBLANK time”. Most of the time, the PPU is drawing whatever you set up in its memory previously, applying some transformations (such as if you’ve scrolled the scene sideways) as it goes. If you try to write to its memory while its drawing, the graphics will “glitch”, and generally jump in a way that isn’t terribly pretty to see. Like many games and forum posts we saw, we went with the simple approach, which is to do most of your work setting up the scene, updating the visual data model (like where the character is on the screen), and reading the controller to see if the user did anything while the PPU is drawing. When the PPU hits the VBLANK region at the bottom, we would blast out as much drawing information as we thought we could before the next refresh of the screen began.
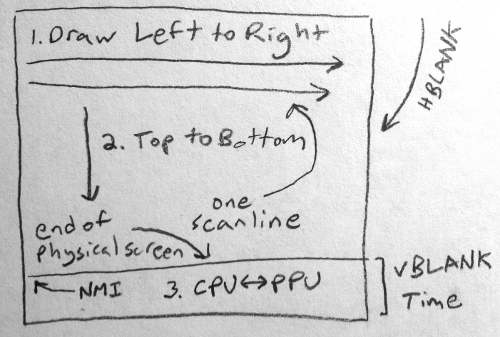
We hit a lot of nasty visual artifacts while doing that, and Alex and I had a newfound respect for the developers that made the original NES games, which were usually more complicated than what we were doing.
That also limited what we thought we could do with clever coding, as it basically made it impossible to update a large part of the screen in a single frame. We could start trying to learn some of the advanced techniques such as cycle counting or custom clock synchronization to squeeze out a little more time to do video updates, or we could look for another method. The Bad Apple NES demo gave us an idea of what optimized software could do, but that looked fairly daunting. We still needed to leave some cycles around for the colors and the controller input, plus some room to process whatever the daughtercard sent.
When we were done dreaming, we thought the following would be a good feature list:
- Some sort of title screen showing the Netflix logo and a One Player / Two Player selector.
- The main Netflix Darwin interface, but in place of the pictures of the TV shows / Movies, a Super Mario Bros style set of platforms that you could jump on to choose one. Perhaps even Metroid / Kid Icarus style scrolling if you fell off the bottom of the screen.
- Updated metadata about the video you were standing on, including a large image from the video in the upper right.
- A screen including a subset of the video features, such as Play, Recommend, and Star Ratings.
- Actual video playing back on the device.
In the end, we had to take out the long list of easter eggs and scale back the above features to finish in time for the hackday presentations.
Implementation
Given the complexity of this hack, we didn’t try to build it in a day. I did that for my last Netflix hackday which wasn’t featured, and I was practically falling asleep by the time I was presenting it. At the start, neither Alex nor I really knew anything about NES development, so we started a series of studies to figure out a bit about what the device could do.
We began with these challenges:
- Proof the build and the development tools
- Figure out some strange (to us) C coding techniques and assembly functions
- Work out how to do split scrolling
- Pack the tile images
- Get video playback working, on CPU and PPU direct
- Add hit detection and jumping
Proving the Build and Setup
In my initial studies, I decided to try out the cc65 compiler along with Shiru’s examples of NES development in C. I expected that the more performance critical sections (such as playback) would involve a fair amount of hand coded assembly, but it would be much faster to implement a lot of the program in a higher level language. I spent some time figuring out the version differences between the examples and the latest compiler, and considered dropping the project, but I was on a JetBlue cross country flight with wifi, so I figured I had nothing better to do. After getting a few roms built, I sent some code and the built roms to Alex before touching down in New York.
One of them was the first loading screen, animating on the text:

Alex took the code and ran with it, quickly deciding that there were better emulators available for development than the mac-native Macifom one that I was using. He got FCEUX working under wine, which let us see a lot more about what the NES was actually doing (such as viewing the name tables or the PPU state), that made our subsequent breakthroughs vastly simpler. He also quickly sourced a few NES’s, replaced the broken cartridge connector on his system, and found a bunch of old cartridges that we could rip apart for the hardware hackery.
For early testing on device, Alex also got us a pair of Powerpaks. One thing I learned early on is that things rarely behave on devices the way they do on the computer during development, so we agreed that the quicker we got the app running on actual hardware, the better off we would be. The NESDev forums echoed this advice, and we wanted to make sure that we weren’t breaking any of the rules of a real system that an emulator would mask. Given the state of our hardware skills early on in the project and that we wanted to modify hardware later, we figured the shortest path would be to pay a little extra to get something designed / assembled by a domain expert. The powerpak was fantastic through our dev lifecycle.
Some New C Coding techniques and Assembly Libraries
To give you an idea of what the programming was like, we threw out a lot of the development practices we had learned in order to write stuff like this:
- Use lots of global variables. There’s only 2KB! While it bit us a few times to be sharing global i and j counters, for example, we were approaching the memory limit several times, so I’m happy we did.
- Use the
__fastcall__convention; if you pass more than one argument, you’re going to cause the compiler to use the stack which is relatively slow (not to mention all of the variable copying you’ll do without realizing it). Functions look like this:unsigned char __fastcall__ func(unsigned char foo);(Then the compiler can pass along your byte on the A register and you can return your result in the same place) - Avoid slow math operations, like arbitrary multiplication or division
- Avoid lots of abstraction as in the common software patterns these days, since those abstractions often trade a miniscule amount of performance for correctness, but that’s only miniscule on more modern hardware than the NES.
While you can still inline your assembly if you need to, calling out to an assembly function from C code is fairly easy. Take this example from the MMC3 memory mapper in DarNES:
Write a .h file:
#ifndef __mmc3_include__
#define __mmc3_include__

void __fastcall__ mmc3_init(void);

#endif
Then a matching assembly .s file:
.export _mmc3_init
.export _mmc3_swap_b

MMC3_CTRL = $8000
MMC3_DATA = $8001

_mmc3_init:
    lda #000001
    sta MMC3_CTRL
    lda #2 ; this fixes the tearing
    sta MMC3_DATA
    lda #4
    jsr _mmc3_swap_b
    rts
And you can easily include it in your c code:
#include "mmc3_include.h"
...
void do_something(void) {
    mmc3_init();
}
(I reused my bank b swapping routine to put the mapper into a decent starting state in the above code)
Usually we could tell when we were going way over the CPU budget allotted before VBLANK time since the graphics would start glitching (and yes, by the end we were that heavy on the main CPU in the home screen - premature optimization and all that).
Working out Scrolling
Scrolling the display horizontally on the NES is relatively easy. In a nutshell:
- Make sure the PPU is in its start state.
- Set up your graphics (including some off the side you’ll be scrolling to) and enable display when you’re ready.
- When you want to scroll (based on a user running right, a time based event, etc), tell the PPU to scroll the scene by that amount.
- Before your user scrolls past the part of the screen where you have graphics, set up some more graphics, possibly reusing tiles that have scrolled too far off.
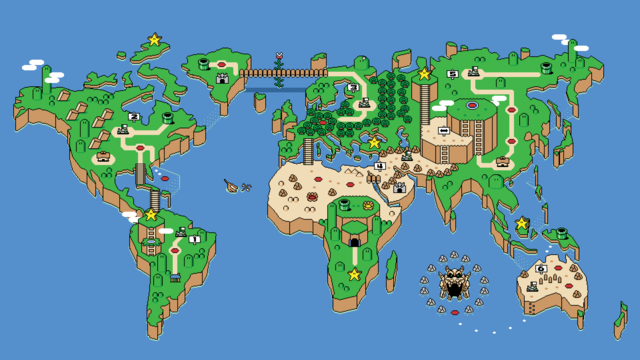
There’s a great image of what’s going on in the NESDev wiki showing world 1_2 in SMB:
Unlike in that example which is showing a scroll for the entire screen (top to bottom), we wanted split scrolling for our interface, with the top standing still while the bottom would scroll along with the user:
So we used the well known “sprite 0” technique. Sprites are foreground images in a display, usually players and monsters in the NES platformers (think Mario, not the world he stands on). The idea is that you place the first sprite (“sprite 0”) with a special pixel (one that doesn’t match the background, we had some fun figuring that out) where you want your screen to split between non-scrolling and scrolling (or vice versa). You tell the hardware that you want to be notified when drawing hits your sprite, and then you time it carefully to wait for the PPU to draw over to the side of the screen. Right when it’s at the end of one line but before the next, you tell the PPU to quickly scroll the rest of the display, and you’re done.
Well, as long as you remember to set it back to unscrolled before the next screen refresh. Loopy posted the heavy details on how it works back in 1994. We used a lot of pair programming and a lot of failed attempts before we figured it out, but pairing proved useful with seemingly insurmountable challenges a number of times along the way.
Packing the tile images
Our data model posed at least one serious problem before we got to detecting if the character was standing on a platform. What were we going to do about the spaces in the middle of titles? The maximum display resolution on the NTSC / US version of the NES was 256x240, so it already was a bit difficult to display enough titles on the screen at a time to be interesting, without having one long title use up an entire line. We began hyphenating and abbreviating long words, something we’d need to apply via heuristic in the network version, or we’d need to pack together a smaller font.
Meanwhile, Alex began attacking the picture display problem. As I said much later, we wanted to see Frank Underwood in all of his 2-bit glory, but that meant taking images beautifully shot for 4K displays, clamping them to 4 colors and stepping them down to a 1/4K for a full screen. The cinematic image we show in the upper right of the screen is 15 by 12 tiles, or 120 x 96 pixels. It wasn’t much of a surprise to either of us that some visual fidelity was going to be sacrificed.
If we give him a collective guilt trip on it, we can probably talk Alex into writing up a better description of the magic he did. I’d like to point out that Alex and I don’t work in the part of the Netflix that handles the asset pipeline, and our target resolution is obviously much lower than what they handle for production use.
The general problem is that we have a source video in some common format (think the original unencoded movie master, H.264, the MPEG-2 my camcorder spits out, or whatever floats your boat) which we plan on removing all of the sexy differential and frequency domain coding from to get a set of back to back static images. Now we need to process these images for NES consumption, and pack them into a binary that will either live on the cartridge or be fed to it by the daughtercard (ignoring the complexities of flow control and DRM here). The pipeline is:
- Process the video to a series of images
- For each image in the series:
- Load the image (convert to a bitmap if it isn’t for easy processing)
- Resize the image and clamp it down to four colors
- Look for 8 x 8 pixel blocks that are “close enough” to each other to remove duplicates
- Write out a data descriptor of the image showing which blocks to put where (paint by numbers, just with blocks)
- Separate the 2 bit pixels to two separate consecutive layers; here’s one row of 8 pixels with 2 bit depth per pixel, converted so we put the first bit of each pixel in the first byte, and the second bit of each pixel in the second byte: 00010111 11111010 –> 00011111 01111100
- Spend some time putting these images into a small loader program on an NES emulator to figure out where something went wrong in the above ;)
Given that it’s Alex, very little time was spent in step 3.
We used almost the same pipeline to pack the images for the video playback, except that there was no block swapping or data descriptor of the image, unlike in the main UI. As we’ll see later when we worked on the video playback, letting the PPU act without much CPU intervention proved to be a boon.
An improved implementation could also make use of the attribute table for two more bits of color per 2x2 block. There’s plenty of room to do more sophisticated image coding with a bit of CPU (or at least just RLE on the result), but then you bring the image from the CHR ROM onto the main RAM, which ties up a lot of cycles. A more sophisticated daughtercard could also swap PRG ROM banks to make this cheap, but we were already a bit concerned about the time remaining until hackday.
Smooth Video Playback
Somewhere along the way, I made the mistake of telling Alex about my new obsession with Final Fantasy XIV. We kissed most of the months between project inception and hackday goodbye with that one swift move. That was the place where we had been planning on leveling up our skills with soldering irons, a Raspberry Pi, an NVIDIA Jetson, and probably burning through a few NES’s before learning how not to let the magic smoke escape from the transistors that made them work. Instead, now he’s nearly a master bard and I’m the equivalent monk. I’m also a Builder of the Realm too, in case you need anything. C’est la monde.
Before we readdressed the hardware issue, we decided to assume a simple control scheme involving bit banging a GPIO pin with the movie selection and after a signal, the CHR ROM, where the graphics data is usually stored, would be filled with a buffer of the video content. We needed to figure out what that video content would look like in memory anyway so that we could determine how fast we could push the stock hardware to display frames at a certain size and quality.
Based on Alex’s clever image code, he took a stab at displaying a few frames, but was running out of space when building the finished ROM. Shiru had included an nes.cfg file which helped the linker lay out the finished ROM to align it with various realities of the NES (where the Zero Page is, how big the header is, where the CHR ROM banks go, etc). It included a few tantalizing hints about the NROM cartridge about how to add some more memory based on some bigger cartridges than the original. He bumped us up from a 24KB cartridge (NES-NROM-128) to the luxurious 40KB cartridge (NES-NROM-256). That still wasn’t quite enough space for the main interface graphics, let alone playback, but unblocked him from starting playback while I looked at getting us more memory that would still work on a real cartridge.
That is, until he interrupted me with a scary question just a few days before hackday: “Hey Guy, what do you think the chances are that someone might have epilepsy in the audience at the hackday presentations?”
“Epilepsy?!?! How bad is the playback,” I asked, knowing that he was working on an early simulation based on the CPU to PPU version with compression used in the main UI.
He showed me. We both now refer to that version as “the flashy mess”.
At that point, time was getting tight, and we had a hard deadline, so we opted not to try something that would make video encoding difficult, such as detecting the optimal regions to update in a differential / delta fashion, similar to a technique used in a regular compressed video. In order to get a decent window size without delta updating, earlier we had brainstormed on using a multipass method, so that we could update 30-50 tiles of the video at a time, and extend that to a larger image by updating them in different phases. When we added on the extra CPU work to replace almost identical graphics tiles and blast them out to the PPU during VBLANK time, his initial C implementation was glitching, part of the image was still leftovers from past frames, and generally the video would appear to be flashing an awful lot, which led his question.
There probably wasn’t time (and it seemed risky) to try hand tuning a lot of that technique in assembly. We discussed options and decided that if worse came to worse, we could probably avoid a lot of flashing in the playback by trading for a vastly worse frame rate. Instead, we gambled on a larger bet. If we could get hardware memory swapping working with a common memory mapper such as the MMC3, we could still probably test with the powerpak and be able to get the chips if we had time for hardware. He went back to studying hit detection and SMB jump physics, while I opened up about 100 web pages to try to understand how to add MMC3 support to our ROM.
I couldn’t understand why there were so many different and conflicting sources of data on how the Nintendo memory mappers worked, and the main MMC3 document that seemed authoritative was written in Japanese. Google translate wasn’t helping me much with that, until I suddenly realized why so many of the addresses didn’t match.
The address pins aren’t all connected!
While the different MMC registers may look different to a programmer, a savvy hardware hacker probably would have glanced at the pinout information and immediately understood the discrepancy. Therein lies the danger with a lot of the unofficial documentation and forum posts; the early pioneers, with little to no official documentation, were going to disagree. The early emulators reflected this by showing different versions of the same game based on how close to reality their emulation was (and what their authors understood and had time to implement, of course). I looked at the source code of a few emulators to use as a concordance with the MMC docs, and suddenly it started to make sense.
I gave Alex a mini MMC3 library with two functions:
void __fastcall__ mmc3_init(void);
void __fastcall__ mmc3_swap_b(unsigned char pagenum);
By using the MMC3 to swap out the entire video page, he could change the complex CPU to PPU pipeline he had in playback to a naive one that simply set up a draw list of which tile of PPU memory showed up where, which was just a sequential array, and change to the second memory bank of tile memory (“Bank B”, hence the function name). Then he could trigger the mmc3_swap_b during VBLANK, and the entire image would change under him.
It worked. I originally went after “Bank B” first since I assumed we needed both banks and it seemed harder to get right (mainly due to the different ways you can swap out parts of the memory page), but the bank swapping of the MMC3 was so fast and the deadline was so close that I just dropped “Bank A”. In fact, this introduced a new problem - the frame rate was so high that we were ripping through all 256KB of CHR ROM tile memory so fast that we could only store about a second of video!
Alex added a delay between the swaps, we dropped our 60fps playback to around 5fps, and we went back to work.
Adding a little Mario, Hit Detection & Jumping
Doing a straight port of Darwin is all fine and good for any arbitrary port of the Netflix UI for TVs, but why go to all the trouble of getting it to run on an NES if you’re not going to add a little guy jumping around the screen? We didn’t want people to use Netflix on the NES. We wanted them to play.
The sketch was simple - have a small character jump between movie titles arrayed like platforms on something like Super Mario 1 (ok, perhaps more like Donkey Kong, but we had at least added scrolling). There were a few obvious problems and some less obvious ones:
- We needed some character graphics.
- Characters are usually drawn on the sprite layer, so we needed some sprite code
- It would probably be annoying if the character fell through spaces in titles (change “House of Cards” to “House-of-Cards”.
- It’s possible to lay the titles out so that you can’t possibly jump to it (a small name below a very long one).
- Jumping should have something resembling physics to it.
- We’d need to know when we “hit” a platform to keep the player from falling.
- We’d need to know what platform was hit in order to update the metadata.
The game part of these topics is covered in extensive detail on the linked resources (in particular, the NESDev forums). While originally we had a complex bit packed representation of the platforms, when time became tight, instead we reduced the problem by realizing hits could only happen at particular y coordinates, so we just did a simple linear traversal through the adjusted start and end x coordinates (you need to account for the scroll) to check hits and determine which title was there. We only made it about 80% of the way through coding that, and the end result was buggy, especially split between the two versions. Improvements for next time!
The Qualitative Interstitial
At this point, we had a usable demo. Why not put some real users on it?
With things in a working state, we threw together a quick plan to take some well known Netflix employees and have them try the product out as if they were brand new or at least relatively new users to collect some humorous outtakes for our video submission. We added a few props, set up some couches and a camera, and started conducting the mock interviews. Alex and I quickly realized that we were out of our element when we tried drawing some storyboards for the shots, and so I tapped an ace at product and partner management, Carenina.
Carenina quickly put us into the right mindset to figure out what we needed for various shots. She kept warning me that a bunch of my ideas, while having some merit, were going to blow out the time budget, but I failed to heed her advice. After sketching out the storyboards, she began putting together a mock product pitch to Netflix staff for “putting Netflix on the NES”, while Alex went back to sorting out some interface bugs in the main screen and I dashed off to go talk the well-knowns into guest starring in the video.
We neglected to remember that these were actually awesome managers in product design, who intuitively understood the limitations of the device, and began putting the app through the paces of any Netflix product while providing a continuous stream of usability feedback, as is common in their regular everyday work. They regularly view early development releases and provide helpful and critical insights into what can be traded to make a better product.
Alex and I were shocked - the results quickly pointed out a number of things that we’d missed as we’d been staring at the previous versions only in the emulator:
- The control scheme was inconsistent and confusing, occasionally sliding between Netflix style Left-Right-Up-Down conventions and SMB style platform gaming,
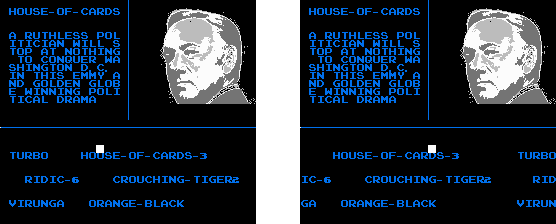
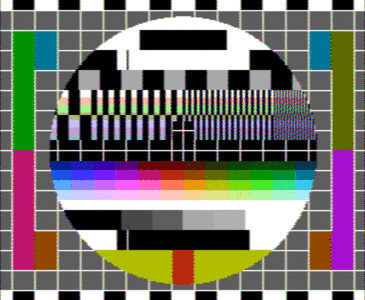
- The fonts were weighted too heavily and were very hard to read with the blue on black palette after putting them through an actual PPU to NTSC conversion; you can get the idea of the deterioration by looking at the thin vertical lines here:
- We’d forgotten to wire up going back and forth between screens,
- The collision detection was a bit wonky when jumping between platforms,
- and a list of things we’d forgotten to implement that were uncovered alarmingly quickly.
While the production was moving along and Carenina was pulling together a great mock project pitch, Alex and I switched over to implementing as much of the feedback as we could.
Who doesn’t want to see the world through Mario’s eyes?
Hackday
Somewhere going into the final day, I floated the idea of having a rap video. It was absurd and ridiculous, but it was getting harder and harder to come by the good video editors, and the equipment we’d seen people bring in for their productions looked intimidating. The next thing we knew, we had borrowed a fancy car, bought some costumes, and started shooting scenes for a spoof of “Ridin’ Dirty” we called “Hackin’ Dirty”. A lot of things went wrong during the shots, such as the lights being too dark, running out of camcorder batteries or us dancing to the original song which didn’t match the time of the final song, but the end product looked like the right level of satirical humor.
We also caused quite a stir walking around the office while the other teams were applying the code duct tape to their hacks.
The code duct tape being applied:
There wasn’t much need to be subtle at this point, after all, we were putting Darwin on the original NES. Rumors of my bet with the device implementation team had circulated widely, and there were more than a few questions about if we were actually going to present anything. It was the final day, so I figured I might as well get the PR cycle going. “Come tomorrow and see it work,” I replied, “Oh, and there’s a rap video.”
People generally didn’t know which claim was more ridiculous.
A number of problems had crept up in the ROM at this point. Alex and I had broken something with the way scrolling and metadata updating were interacting; if you look carefully, you’ll notice in the close up shots for our video submission at 00:18 (not the hackday presentation) that the player drops onto the Ridiculous Six title, but the metadata shows Crouching Tiger Hidden Dragon 2, only after a wrap-around scroll to the right. We repaired the most egregious errors, but we needed the rest of the time to splice together the video.
By this point, we’d already completely thrown out any dream of adding the raspberry pi daughtercard to the cartridge. We also tossed the video from the qualitative trials, mainly due to the time needed to edit it and we hadn’t planned out the shots very well. The three of us put together a quick set of slides I could talk through at the actual event, and then Alex and I sat down to edit the rest of the video. Despite our preparations, we still didn’t leave the building until well after midnight, but we were ready for Friday.
Aftermath
The Friday 2 minute presentation was a bit crushed together, but it got the point across.
The day was intense, and the teams had really worked very hard to show the full range from totally impressive through completely useful, and on to absolutely hilarious. To anyone who hasn’t been to a silicon valley hackday, there was approximately an even split of:
- The super complicated ones that didn’t work,
- The super complicated ones that did work,
- The super complicated ones that even surprised the hackers that wrote them that they worked,
- And the ones that focused on something clever without being overreaching that just plain worked.
Everyone who attended hackday had a chance to vote. There weren’t any judges deciding the winners and losers, but there was a host to keep things moving along smoothly and a number of organizers that handled vetting the categories and validating the entries. Each hack had two minutes on one side of the stage, and much like a packed open mic, the next gig was preparing theirs on the opposite side. You can get an idea of what it looked like here:
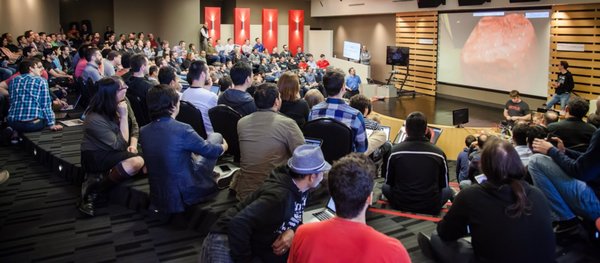 (if you look closely, you can just barely make out the NES sitting under the TV to the left of the projection; we didn’t want to try hooking the composite out up to the HDMI feed from the projector)
We didn’t win. Unfortunately for us, we were in the same category as “Say Whaaat!!!”, the hack that did win, and as cool it was to put Darwin on the NES, I’m glad that Joey and Adnan earned the award. Their feature looks so incredibly useful and their demo was so smooth, I think most people that saw it simply assumed that it was already integrated and ready for release in the real product. Joey is a fantastic developer, and even with the tough work he had getting his hack to work, he still found the time during hackday to bring in a costume and sit in for a quick shot in the Hackin’ Dirty video. I’ll leave it to you to find him, though.
The committee asked us if we could add in a bit to our video submission as the last minute version we shot on Friday morning before the deadline didn’t show working playback, which was probably the most impressive part of the app. At the time, anyone at the company could see the video submissions, but we wanted to leave a bit of surprise for the actual event, so it was an intentional omission. We thought about just patching together the existing undersell video clip with the playback, but instead got Carenina at the last minute and put together the video that got picked up by the internet on Monday morning. After all the work on the hack, the rap video, the product pitch, and the qualitative research round, it was a bit of a downer to read some of the comments on the video production quality, but to the haters I have to say: well, a bunch of things I won’t type about Monday mornings and no time for coffee.
When there’s a little more time, I’d still like to look at what it would take to get a raspberry pi working with a daughtercard, and if anyone is interested in contributing some electrical expertise, feel free to hit me up on twitter.
A Word of Thanks
Special thanks go out to Alex Wolfe for his excellent coding and diligence through the project, even when I was considering giving up, as well as his last minute mastery of iMovie; to Carenina Motion for her midnight hour help in getting this all put together during the stress and excitement of the final days; to Matt, Kim, and Jeff for their help with the qual; to Kris, Leo, Leslie, and Morgan for sitting in on the product pitch and being great sports about it; to Joey, Vishal, Bradley, and Eric for the rap sequence; to Sam for his advice on the video and the feedback I needed to hear on slicing it up; and to Netflix and the hackday organizers for putting together such an excellent event despite their busy schedules. Hope to see you all again at the next one!
Additional thanks go to Shiru for his excellent work with the C language NES examples, the FCEUX, Macifom, and the cc65 authors, and Loopy, Kevtris, Nerdy Nights, and the emulator & homebrew communities that figured out how the NES really works and shared that information.